

After three years of making Dr. Davis's triple-strain SIBO yogurt — a fresh batch about every other week — I've learned something important: equipment matters more than you think.
When I first discovered Dr. Davis's L. reuteri yogurt method, I was overwhelmed by the choices. Which sous vide cooker? What size jars? Which probiotic starters actually work? After dozens upon dozens of batches—and yes, a few spectacular failures—I've figured out exactly what works for us.
Here's the truth: I've had about a 98% success rate over three years. Only 2-3 bad batches out of dozens of great ones. And the secret? It's not magic. It's having the right equipment and understanding how to use it.
Let me share what I've learned, so you can skip the trial-and-error phase I went through.
#Key Takeaways
- Sous vide is the most reliable setup: a precision cooker holds 106°F rock-steady for the full 36 hours — the Anova 3.0 is plenty (the Pro is overkill).
- A good yogurt maker works too, as long as it lets you set an exact temperature; avoid preset Instant Pots and "yogurt-button" machines that run too hot for L. reuteri.
- Ferment in wide-mouth Mason jars with plastic (not metal) lids — I screw my Ball leak-proof lids on and fully submerge; Dr. Davis instead recommends a loose lid with the water only up to the milk level so gas can vent. Both work.
- The real recipe is triple-strain SIBO yogurt: BioGaia Gastrus (L. reuteri) + L. gasseri BNR-17 + B. subtilis HU58 (or B. coagulans in the classic), plus 2 Tbsp prebiotic fiber per quart.
- Budget ~$150–250 for the full setup; spread over dozens of batches the per-batch cost drops to a few dollars.
#Why Equipment Actually Matters for L. Reuteri Yogurt
Here's something that surprised me: L. reuteri is incredibly temperature-sensitive. Research on L. reuteri DSM 17938 shows that maintaining a consistent fermentation temperature is crucial for these bacteria to survive and thrive. The Dr. Davis protocol I follow runs a touch warmer than some lab studies—106°F (41°C) for 36 hours—and in my experience it is that rock-steady consistency, more than the exact number, that delivers reliable, thick results.
And here's the kicker: temperature issues are often the real problem when batches fail, not your starter culture or milk choice. Many preset yogurt makers run hotter than expected—some reaching 120°F or higher—which can cause virtual wipe-out of the bacteria.
That's why I'm obsessive about equipment. When you're fermenting for 36 hours straight, even a few degrees off can mean the difference between thick, creamy yogurt and a watery disappointment.
A note on health information: The information shared here is for educational purposes only and is not intended as medical advice. L. reuteri yogurt is a fermented food, not a medical treatment. Always consult with a healthcare professional before making changes to your diet, especially if you have existing health conditions or are taking medications.
#The Sous Vide Cooker: Your Most Important Investment
#My Choice: Anova Precision Cooker Pro (the 3.0 is plenty)
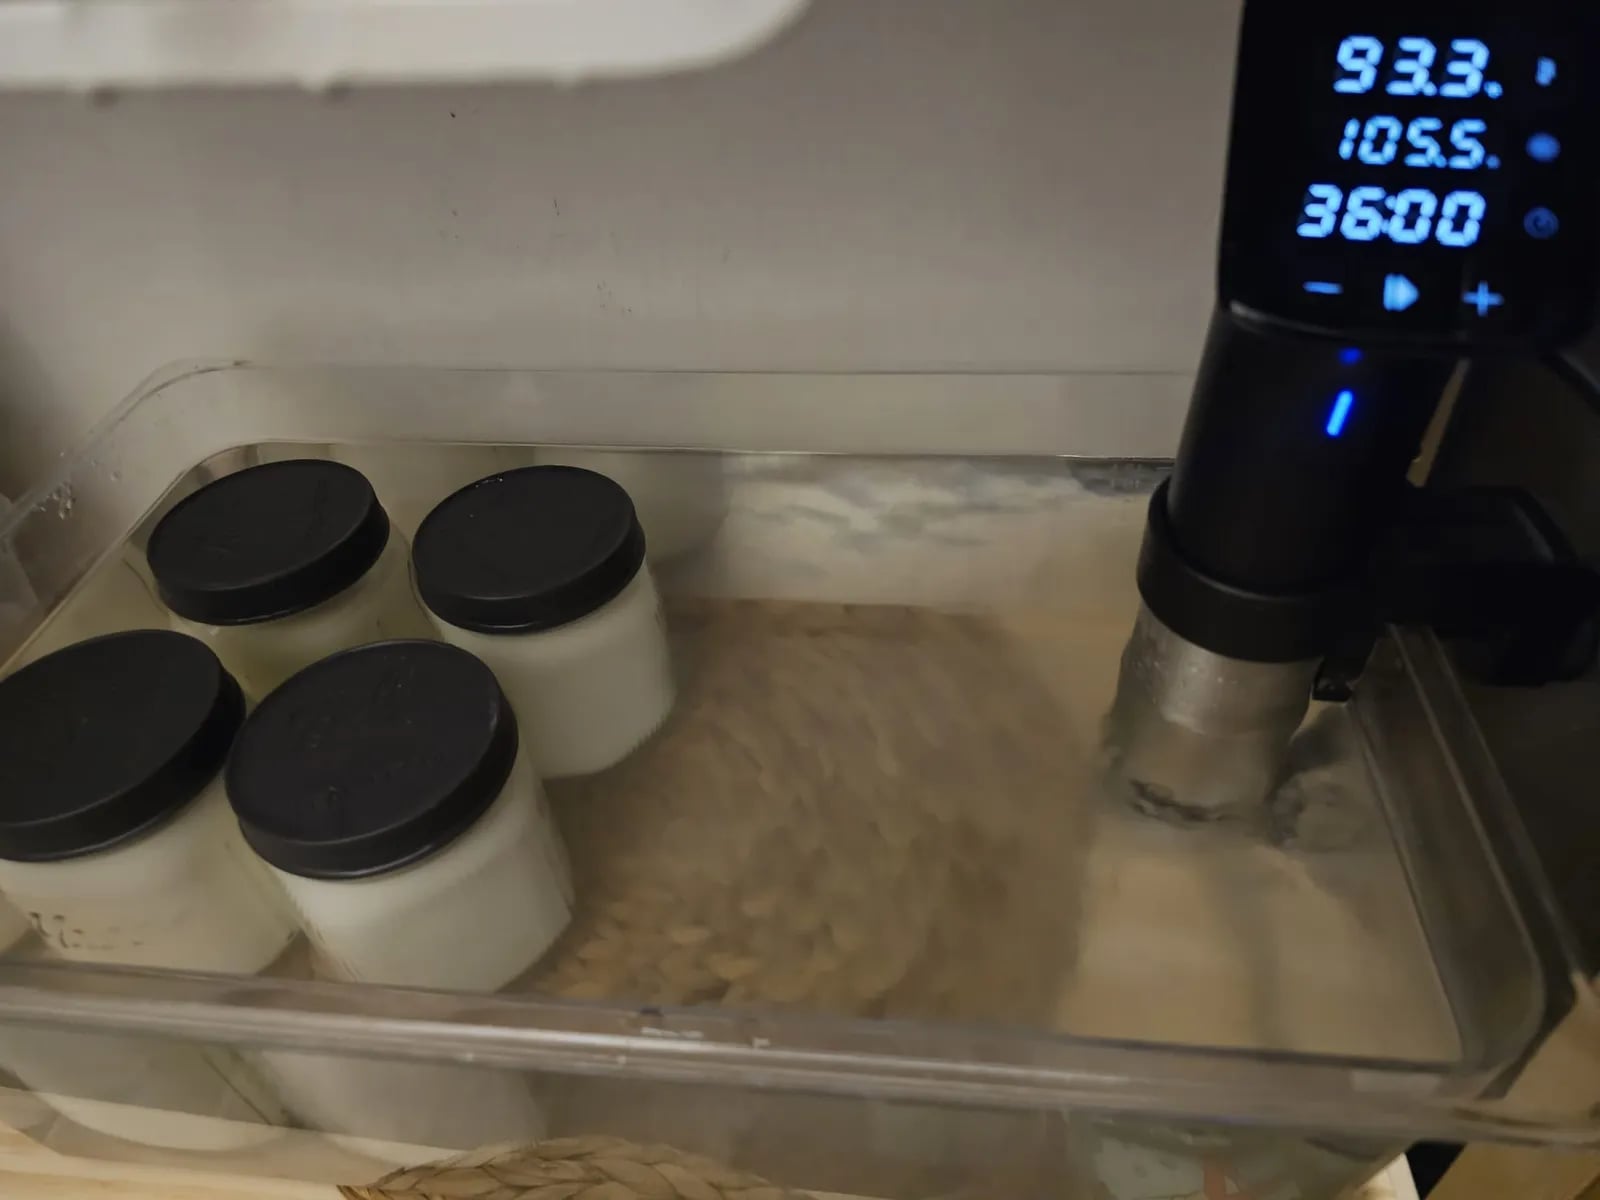
After three years of regular batches, I can confidently say: invest in a quality sous vide cooker. I use the Anova Culinary Precision Cooker Pro in a 25-liter water bath — honestly it's overkill for yogurt, and the more affordable Anova Precision Cooker 3.0 would totally do the job. Mine's been absolutely bulletproof.
Why sous vide works so well:
- Precision temperature control: holds exactly 106°F for the entire 36-hour fermentation
- Set it and forget it: no babysitting, no temperature swings, no anxiety
- Scalability: make however many jars you want — I make up to 8 × 32 oz — my 25 L container's max — which lasts my small family about 2-3 weeks
- Versatility: it's not a single-use gadget — I cook plenty of other things in it too
The Dr. Davis standard: we follow the original protocol — 106°F for 36 hours. It comes out thick, creamy, and just right, batch after batch.
#Other Machines — and Why I Still Prefer Sous Vide
Plenty of dedicated yogurt makers do a genuinely great job. The Luvele and a few others are well-loved in this community, and I've heard excellent feedback from readers who use them — many let you dial in a precise temperature, which is exactly what L. reuteri needs.
So why do I still reach for my sous vide? Three reasons:
- Accuracy and reliability: it holds 106°F rock-steady for the full 36 hours, batch after batch.
- Versatility: it's not a single-purpose gadget — I cook all sorts of other things in it.
- Batch size: I can make a relatively large amount (my 8 jars) in one go.
A couple of methods I'd be more careful with:
- Instant Pot yogurt setting: many run hotter than L. reuteri likes (the preset is built for traditional cultures) — if you use one, verify the real temperature with a thermometer first.
- Oven light or heating pad: workable in a pinch, but the temperature drifts, so consistency is hard.
Bottom line: a sous vide like the Anova Precision Cooker 3.0 or the compact Nano 2.0 is my pick for accuracy, versatility, and bigger batches — but a good yogurt maker will absolutely get you there too.
#The Water Bath Container: Size Matters
I use a 25-liter water bath container, and here's why size matters:
- Holds 8 x 32 oz jars comfortably with room for water circulation
- Maintains temperature stability (larger water volume = less temperature fluctuation)
- Prevents evaporation issues during the long 36-hour ferment
You can use a large stockpot, but I recommend a dedicated container like the COSPARX Sous Vide Container 12 Qt if you're making smaller batches. The clear sides let you monitor everything without opening the lid.
Pro tip: Cover your water bath with plastic wrap or a lid to minimize evaporation. After 36 hours, you'll lose a surprising amount of water otherwise.
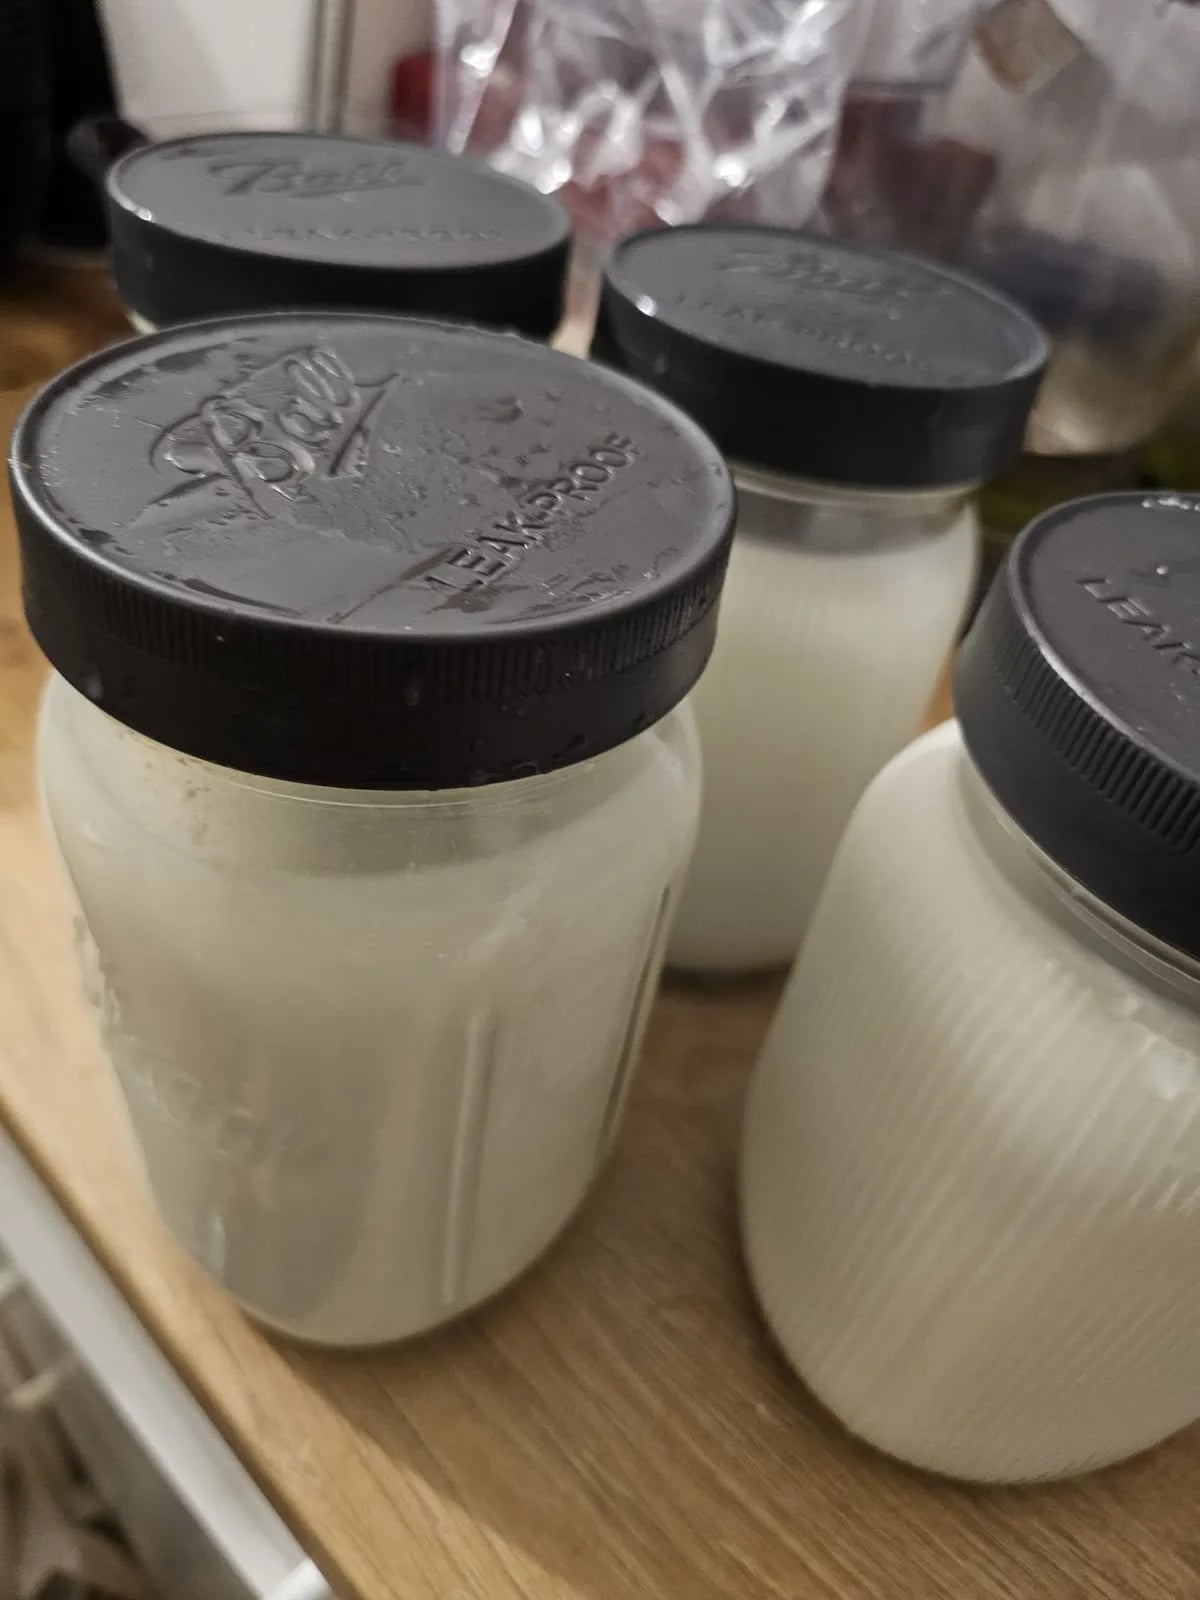
#The Jars: Wide-Mouth Mason Jars + Ball Lids
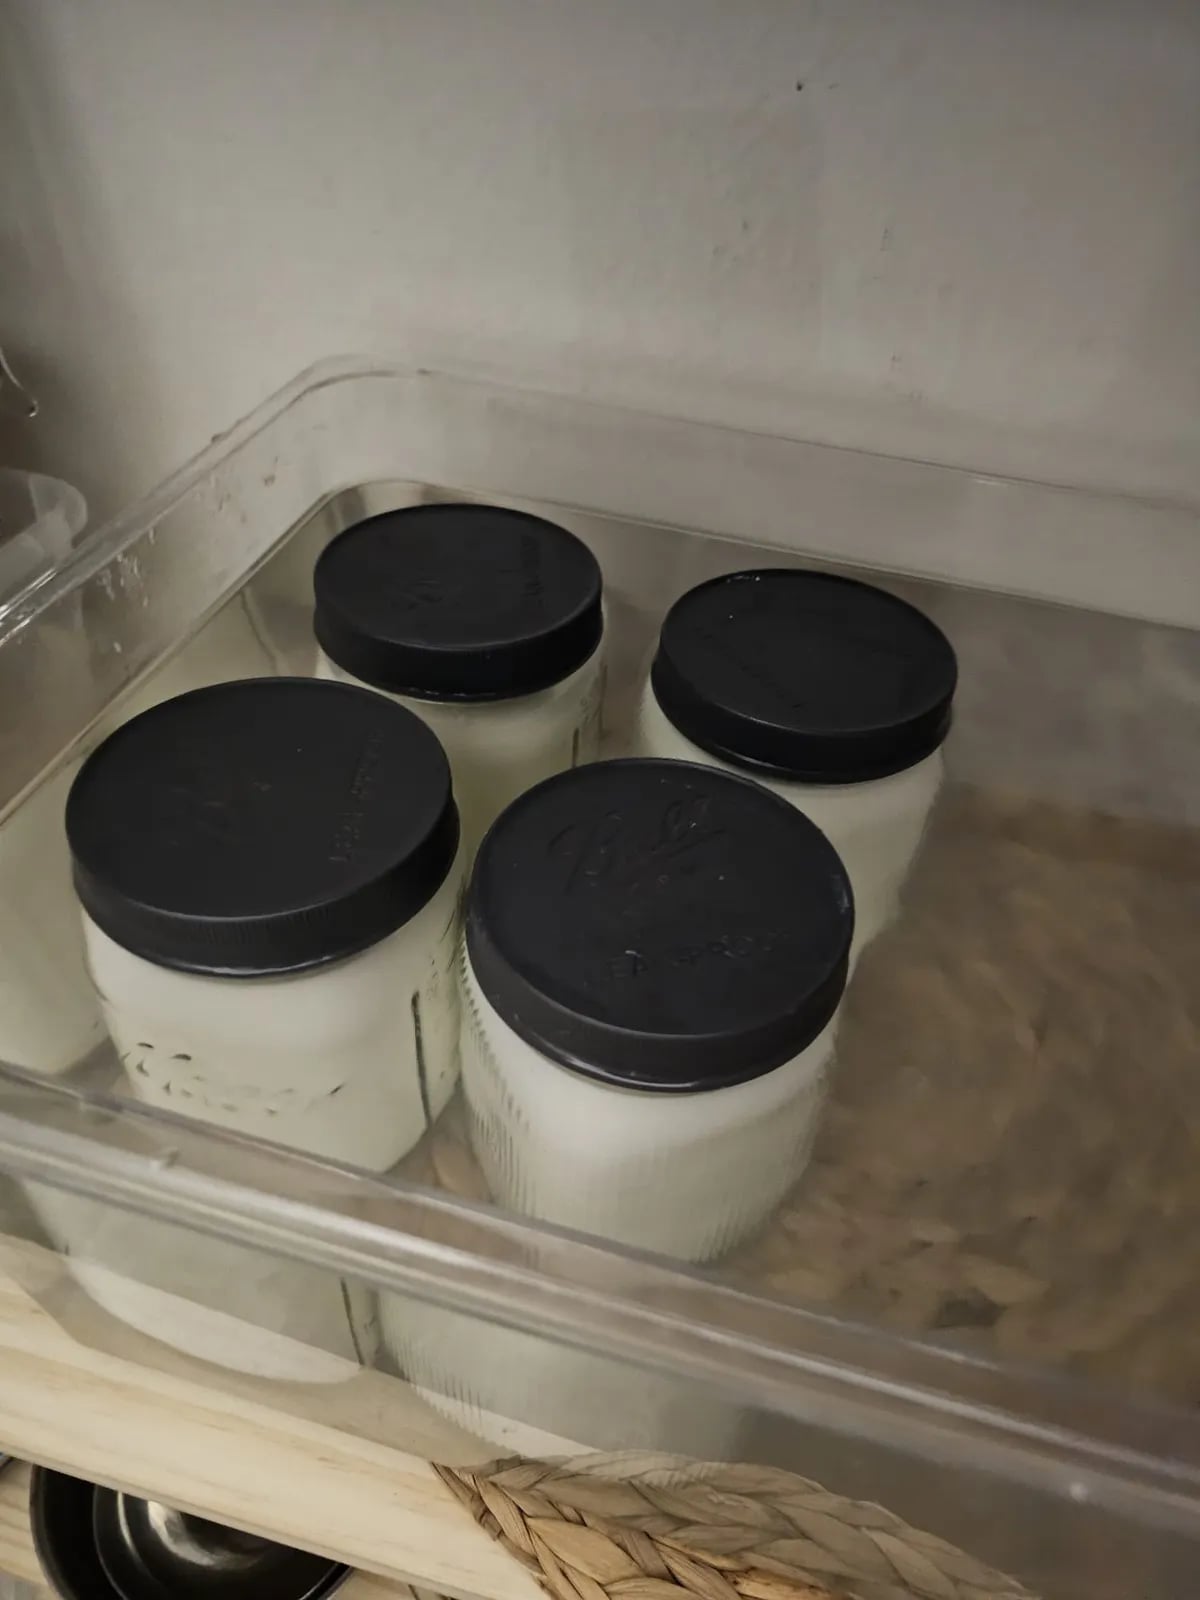
I ferment right in the jars, submerged in the sous vide bath — 8 x 32 oz wide-mouth Mason jars per batch, and I'll never go back to anything else.
Why wide-mouth specifically:
- Easy to fill and clean: you can get your hand inside to scrub thoroughly
- Perfect for adding prebiotic fiber: I add prebiotic fiber to each jar, and the wide opening makes mixing easy
- Convenient size: make as many 32 oz jars as you'll realistically get through
- Reusable and sustainable: I've used the same jars for years
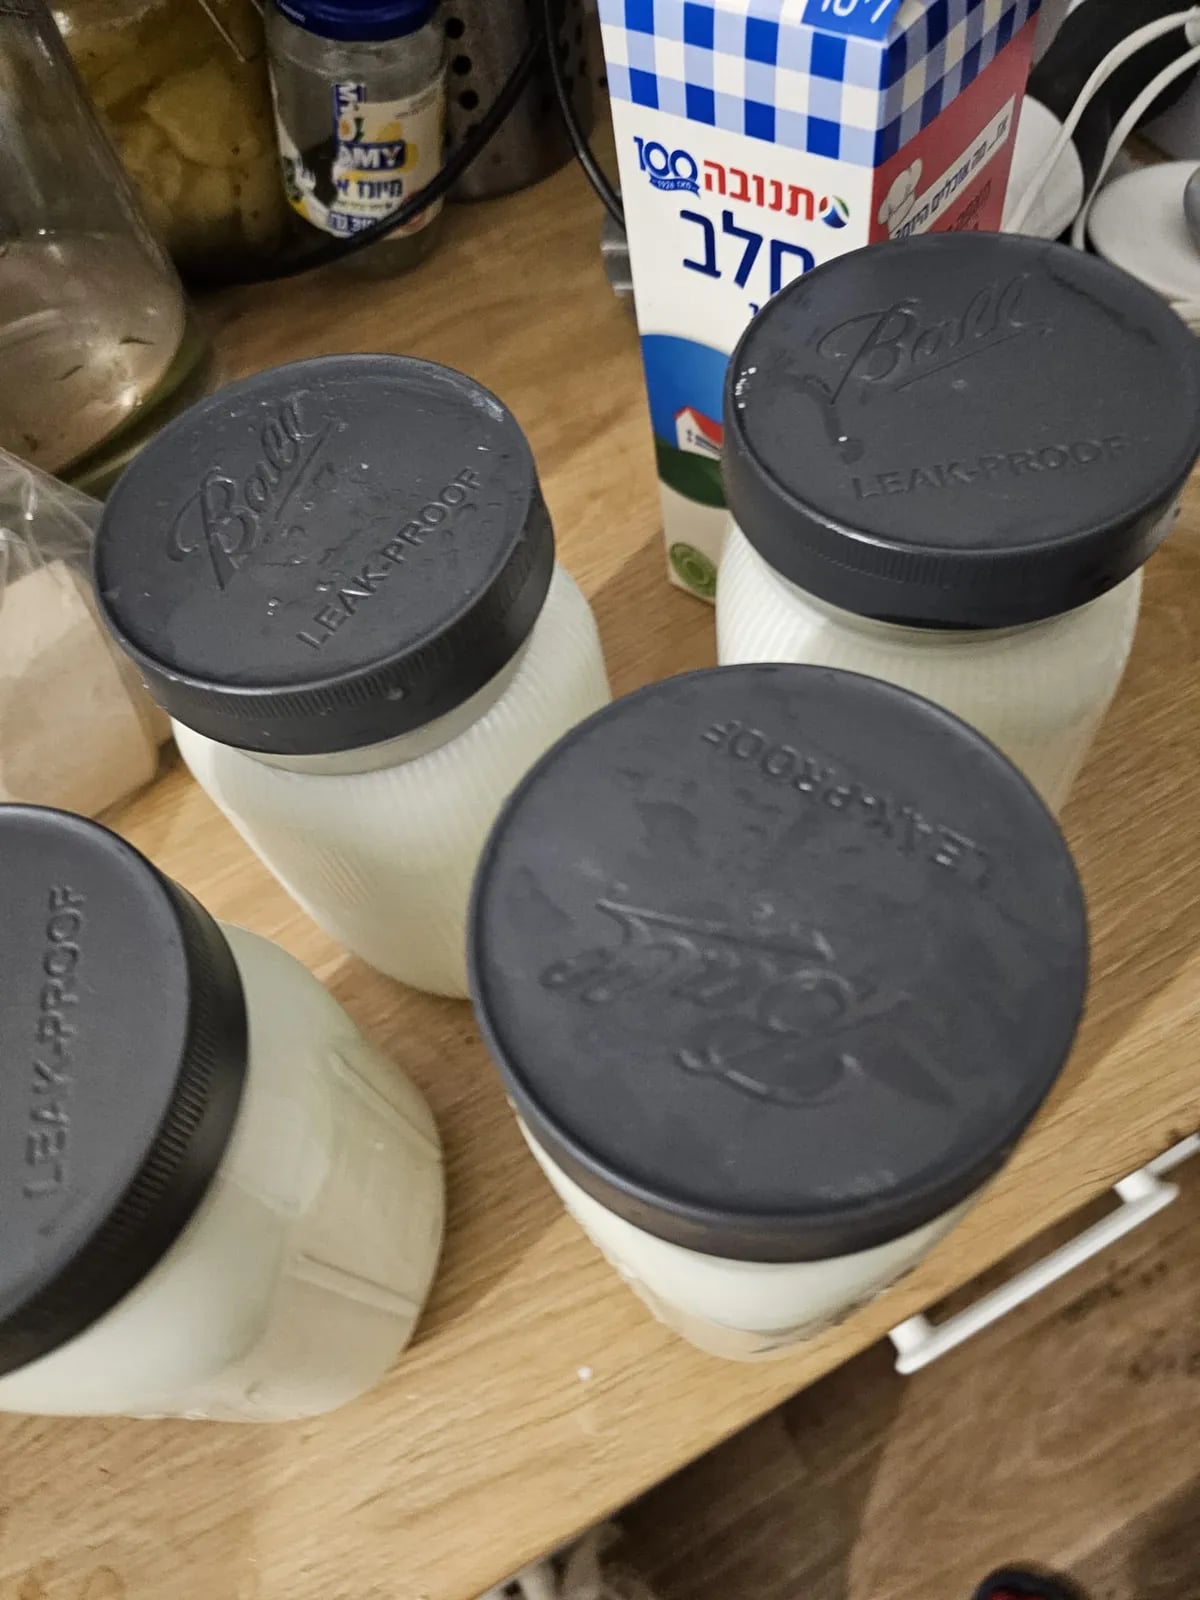
The lids matter too: use plastic lids, not the default metal ones (metal reacts with the acidic yogurt) — I use the Ball leak-proof black plastic lids. Two approaches both work: what I do is screw the lids on securely and fully submerge the jars; what Dr. Davis recommends is a loosely-fitting lid (or plastic wrap) with the water filled only to the milk level — not over the lids — so the small amount of fermentation gas can vent. (These ferments are a little "expansive," and Dr. Davis notes fully tight lids can occasionally make a batch split; the loose-lid method is his official recommendation and the more forgiving choice if you ever overfill the bath.)
You can also grab the Paksh Novelty Wide Mouth Mason Jars 32 oz if you want extras or backups.
#The Probiotic Starters: The Triple-Strain SIBO Yogurt
Here's the most important thing to understand: what we make isn't just L. reuteri yogurt — it's Dr. Davis's triple-strain SIBO yogurt. You can make L. reuteri on its own and it's wonderfully beneficial, but in our house we stand by the full triple-strain version.
#1. BioGaia Gastrus (L. reuteri) — the foundation
BioGaia Gastrus contains L. reuteri DSM 17938 and ATCC PTA 6475 — the exact L. reuteri strains Dr. Davis uses. Consistently thick, creamy, and mild. Research shows these strains can produce antimicrobial molecules, strengthen the intestinal barrier, and support beneficial immune responses. About $30-40 for 30 tablets, and you can perpetuate it by reusing a few spoonfuls of your last batch.
#2. L. gasseri BNR-17 — not optional for us
Dr. Mercola BioThin is L. gasseri BNR-17. It's not a "maybe" in our kitchen — it's a core part of the triple-strain SIBO yogurt, and we wouldn't skip it. It ferments beautifully on the same 106°F/36-hour protocol, just a touch tangier.
#3. The third strain: B. coagulans → now B. subtilis HU58
The original recipe used Bacillus coagulans (Schiff Digestive Advantage) — genuinely delicious, and what we've used and loved for years. (One tip from experience: go easy on the coagulans — too much was behind a couple of my rare failures.)
In his 2025 update, Dr. Davis replaced B. coagulans with Bacillus subtilis HU58 (Microbiome Labs HU58), along with an updated method — I walk through the full current recipe in The 2025 SIBO Yogurt Update. Full disclosure: we still make the beloved older triple-strain at home, but I just got my hands on a fresh batch of HU58 — I'm about to make it for the first time, and I'll report back in a future article.
Bottom line: for the real SIBO yogurt you want all three strains — BioGaia Gastrus, L. gasseri BNR-17, and the third strain: B. subtilis HU58 in the current recipe (or B. coagulans in the classic).

#The Secret Weapon: Prebiotic Fiber
This is the ingredient that takes L. reuteri yogurt from good to extraordinary: prebiotic fiber.
What it does: Prebiotic fiber feeds the L. reuteri bacteria, helping them produce more of the beneficial compounds we're after—including the famous oxytocin-boosting effects that may contribute to wound healing and other health benefits.
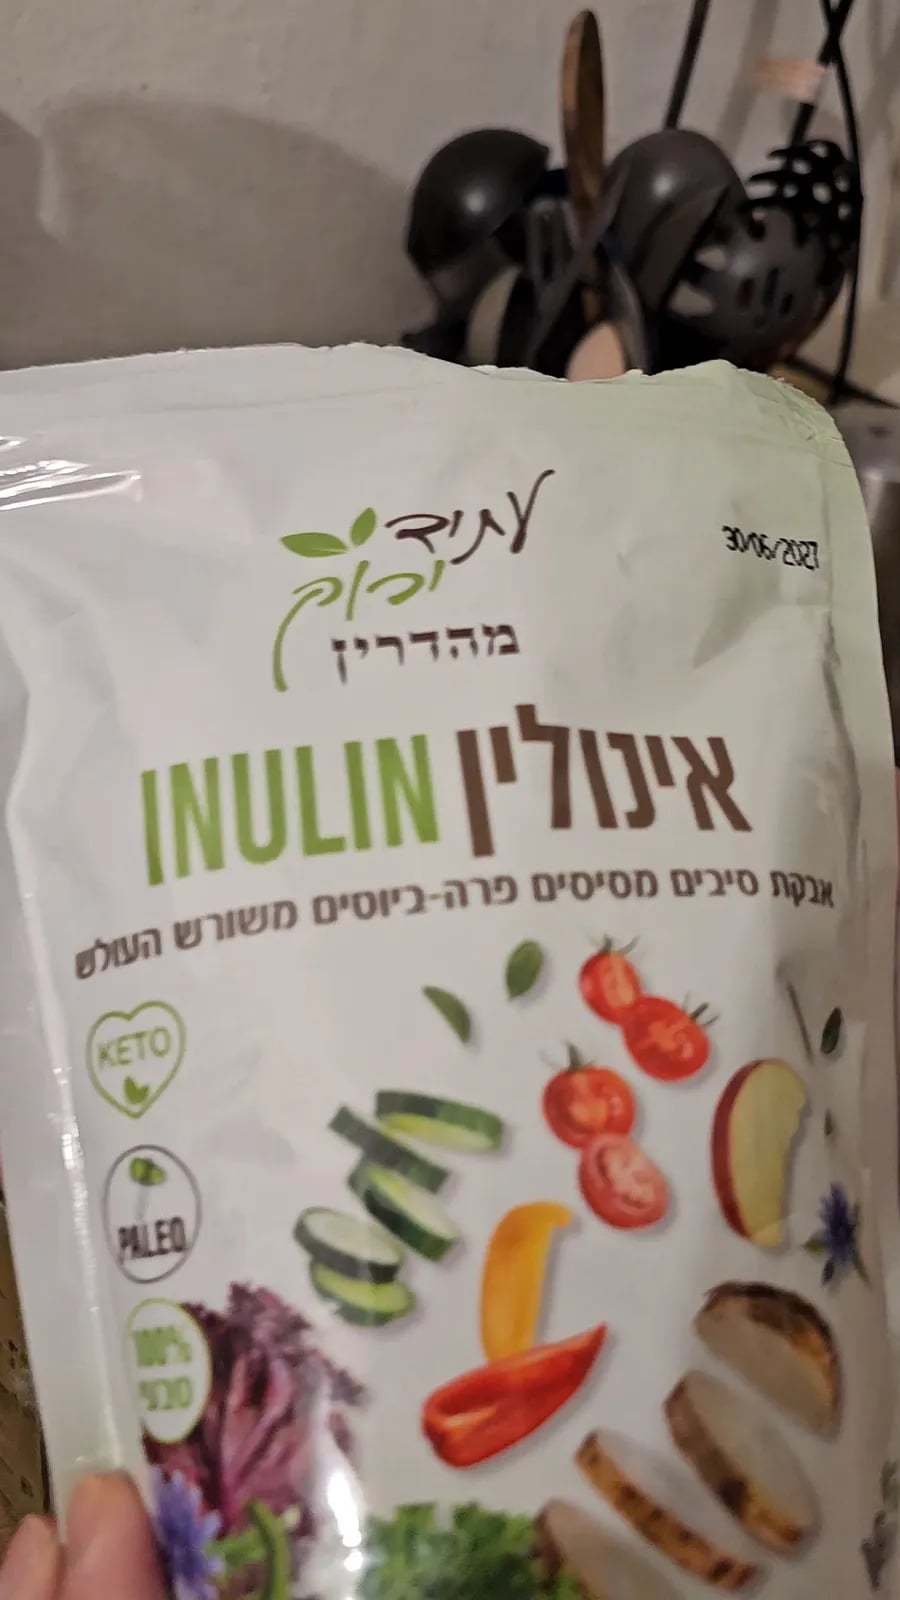
How I use it: The recipe calls for 2 tablespoons of prebiotic fiber (inulin or raw potato starch) per quart — about one 32 oz jar. I usually use a plain local inulin, and I have also used Cutting Edge Cultures Prebio Plus, which was really great. A tip straight from the recipe: first make a slurry with a couple of tablespoons of the milk so the fiber doesn't clump, then stir it into the rest along with your starter.
The result: Thicker yogurt, better consistency, and (in my experience) more noticeable benefits.
Note: Some people skip the prebiotic fiber entirely and still get great results. But after trying both ways, I'll never go back. The difference is real.
#The Milk: What I've Learned Through Trial and Error
After three years of experimentation, here's what works for us:
The original recipe uses half-and-half. What I personally use: regular 3-4% whole milk.
We tried a richer 50/50 blend (half-and-half mixed with whole milk), but my wife found it too "fat" and rich. Here's the important part: the original Dr. Davis recipe calls for that half-and-half blend — that's the standard, and it's how most people make it. We're the exception. Because my wife finds half-and-half too rich, we use plain 3-4% whole milk, which works great for us and still comes out thick and creamy. Both are valid — just know that 3-4% is our personal deviation, not the original method.
One failure I learned from: I tried enriched milk once (the kind with added vitamins). It didn't work — so the milk to avoid is enriched (added vitamins) or ultra-filtered. Everything else is easy: regular whole milk is the safe bet, and ordinary UHT / ultra-pasteurized milk works great exactly as-is (it's already heat-treated, which actually helps the set). In lots of places — including here in Israel — that long-life carton is the standard 3% milk, and it's perfect for this.
Goat milk works too, and it's genuinely delicious — it just costs a bit more and tends to separate a little more readily (both the curds and whey are still good). One of these days I'll get a goat or two. 🐐
On pre-heating the milk: The original Super Gut recipe skips this — you combine the ingredients and ferment directly. Dr. Davis's newer "improved" method, though, heats the milk to ~180°F (82°C) for about 20 minutes first, to denature the whey proteins for a firmer, thicker set. I personally skip it — the milk I use is already pasteurized and the texture is great as-is — but if you want a firmer set, the pre-heat is the lever to pull. (Dr. Davis's method.)
Pro tip: The very first batch from a fresh starter tablet has a bit more whey separation. Don't worry—this is normal. Subsequent batches (when you use a few spoonfuls of your previous batch as starter) will be more consistent.

#My Personal Journey: Three Years of This Yogurt
Let me share why I'm so passionate about getting the equipment right.
Three years ago, I discovered Dr. Davis's L. reuteri yogurt method, and it genuinely changed our lives. We eat it every single morning, religiously, and we still look forward to it. It's not a chore—it's a ritual we love.
The equipment setup I've described isn't theoretical. It's the result of dozens upon dozens of batches, a few spectacular failures, and countless small adjustments. That 98% success rate? It didn't happen by accident. It happened because I invested in the right tools and learned exactly how to use them.
The failures taught me everything:
- The batch that failed because I used too much B. coagulans taught me that more starter isn't better
- The enriched-milk disaster taught me to stick with simple, whole milk
- The early temperature fluctuations taught me why sous vide precision matters
Now it's effortless. About every other week I set up the sous vide, and a day and a half later we have a fresh couple of weeks' worth of thick, creamy, probiotic-rich yogurt.
The texture? We don't strain it most of the time — we love it exactly as it comes out: creamy and solid, one step before it would turn into thick Greek yogurt. It's just right spooned over our morning muesli.
If you're struggling with inconsistent batches or wondering whether to invest in better equipment, I hope my experience helps. The right tools don't just make the process easier—they make success far more reliable.
#Troubleshooting: When Things Go Wrong
Even with perfect equipment, you might encounter issues. Here's what I've learned:
#Problem: Yogurt is too thin or watery
Likely causes:
- Temperature too high (killing bacteria) or too low (insufficient fermentation)
- Not enough fermentation time (give it the full 36 hours)
- First batch from fresh starter (this is normal—it gets thicker with subsequent batches)
Solution: Verify your temperature with a separate thermometer. If it's your first batch, be patient—the next one will be better.
#Problem: Yogurt tastes off or sour
Likely causes:
- Contamination from unclean jars
- Temperature too high, creating off-flavors
- Over-fermentation (more than 36 hours)
Solution: Sterilize your jars thoroughly. Stick to exactly 36 hours. Verify temperature.
#Problem: Yogurt separated into curds and whey
Likely causes:
- Temperature fluctuations during fermentation
- Jars were moved or disturbed during fermentation
- Wrong type of milk (enriched or ultra-filtered — regular UHT / ultra-pasteurized milk is fine)
Solution: Use a stable sous vide setup. Don't disturb the jars during fermentation. Use regular whole milk.
For more detailed troubleshooting, check out Why Your L. Reuteri Yogurt Isn't Working: 8 Hidden Mistakes and our Fermentation Temperature Guide.

#Storage and Shelf Life: Making Your Yogurt Last
Once you've made your perfect batch, proper storage is crucial.
My storage method:
- Keep jars sealed in the refrigerator at 35-40°F
- Use within 2-3 weeks for best quality and probiotic potency
- Always use a clean spoon to avoid contamination
Signs your yogurt has gone bad:
- Mold (any color—discard immediately)
- Pink or orange discoloration
- Foul smell (different from the normal tangy yogurt smell)
- Excessive liquid separation that doesn't reincorporate when stirred
For detailed storage guidelines, see How Long Does L. Reuteri Yogurt Last? Storage & Spoilage.
Pro tip: Save 2-4 tablespoons from your current batch to start your next batch. You can perpetuate your yogurt indefinitely this way, only needing fresh probiotic tablets every few months if you want to refresh your culture.
#The Complete Equipment Checklist
Here's everything you need to make the triple-strain SIBO yogurt:
Essential Equipment:
- ✅ Sous vide cooker — Anova Precision Cooker 3.0 (or Nano 2.0; I use the Pro, which is overkill)
- ✅ Large water-bath container (25L for 8 jars, or 12 Qt for smaller batches)
- ✅ Wide-mouth Mason jars 32 oz + Ball wide-mouth lids
- ✅ BioGaia Gastrus (L. reuteri)
- ✅ Dr. Mercola BioThin (L. gasseri BNR-17) — part of the triple strain
- ✅ Microbiome Labs HU58 (B. subtilis) — the current third strain (or Schiff B. coagulans for the classic recipe). Unlike coagulans, HU58 is fermented separately (~90–100°F for 24h) and combined at serving — see my HU58 update
- ✅ Prebiotic fiber — inulin (I use a local one) or Cutting Edge Prebio Plus
- ✅ Half-and-half (the original recipe) — or whole milk, which is what I personally use
Nice to have:
- 🔹 Extra Mason jars for backup
- 🔹 A digital thermometer to spot-check your setup
Total investment: roughly $150-250 for the complete setup. Spread over dozens of batches, the per-batch cost drops to just a few dollars.
#Final Thoughts: Is It Worth It?
After three years of making this yogurt — a fresh batch every couple of weeks — I can answer this definitively: absolutely yes.
The equipment investment pays for itself within a few months compared to buying commercial probiotic yogurt (which doesn't even contain L. reuteri). But more importantly, the consistency and reliability you get from proper equipment means you'll actually stick with it.
There's something deeply satisfying about opening the sous vide after 36 hours and seeing eight perfect jars of thick, creamy yogurt. It feels like alchemy. It feels like taking control of your health in a tangible, delicious way.
My advice: Don't cut corners on the sous vide cooker. It's the foundation of everything. My Anova Pro has been absolutely bulletproof — though the more affordable 3.0 would serve you just as well. I can't imagine making yogurt any other way now.
Start with the basics—sous vide, jars, BioGaia Gastrus, and Prebio Plus. Master the process. Then experiment with different strains, milk ratios, and fermentation times if you want.
But honestly? The basic method works so well that you might never need to change a thing.
Here's to thick, creamy, probiotic-rich yogurt that actually works. Here's to equipment that takes the guesswork out. And here's to the quiet satisfaction of making something genuinely beneficial with your own hands.
Happy fermenting! 🥛✨
Disclaimer: This article is for informational and educational purposes only. It is not intended to be a substitute for professional medical advice, diagnosis, or treatment. Individual results may vary. The equipment and probiotic strains discussed are fermentation tools and food ingredients, not medical treatments. Please consult your healthcare provider before beginning any new dietary practice, especially if you have a medical condition or take medications. The author's personal experiences are anecdotal and should not be interpreted as guaranteed results.


